Upscaled 2x. Special thanks to Peri for noticing the GBA footage.
Unfortunately, the original images weren't archived, so we'll have to make do with the thumbnails.The first one seems to show Takua in Le-Koro. It doesn't look like there are any other islanders present, but it's hard to tell? The second image appears to be of a body of water in Onu-Wahi. I don't think this image matches any map in the final game, but again, I'm not 100% sure of that. Interestingly, neither of these screenshots has a heads up display (or so I think). The third image is included because it shows the right side of the TV. Judging by the border around the game, I think this was camcorder footage of a GBA dev kit's screen, similar to the demo footage on the Power Pack.
All 6 screenshots are totally new to me – I don't think they were used anywhere else! Frankly, I'm astounded that this file is still available, given Brickshelf/Maj's troubles over the years. (That said, if you own NP 146 or have access to a higher quality scan, please get in touch.)
On a similar note, both the Nintendo Power Advance and Nintendo Power walkthroughs show tame Ussal crabs in Onu-Koro, but they do not appear in the final game. In other words, Nintendo Power's copy of the game was a prerelease build. I haven't noticed anything else odd about their screenshots, but it wouldn't surprise me if something is staring me in the face.
Left: NPA 2, right: NP 148. Nintendo Power photo by Toa Nidhiki05,
Finally, Nintendo Power once uploaded gameplay footage of the Kofo-Jaga fight in Po-Koro. Unfortunately, the original footage wasn't archived, but the thumbnail was. I can't spot anything strange about the thumbnail, but I'm including it for completeness' sake:
Before I go over the prerelease images one by one, there's something that needs to be addressed. Put simply, I'm not sure they're actual screenshots. Please, stay with me while I break out my corkboard and red marker.
Let's start with an easy one. This screenshot is simply too tall. It's 240x180 (4:3), which is 20 pixels taller than the Game Boy Advance's 240x160 (3:2). There is no evidence to suggest that the GBA was ever intended to use a screen of this size. As far as I can tell, all of the GBA developer kits outputted in 3:2 resolution. (In fact, as far back as 1995, Nintendo was rumored to be developing a handheld console with a 3 inch by 2 inch screen.) It's possible that the game was originally being developed for a different system, but from what I've found, I don't think a single console in 2000/2001 used a 240x180 screen.
The image isn't stretched, either. There are visual artifacts that suggest it's made up of 8x8 tiles, most notably around the edges of the hut in the upper right.
As such, I don't see any way that this could be a legitimate screenshot. But, of course, that doesn't prove that any of the other screenshots are fake, does it?
Let's move on to the Brakas screenshot. This one is odd in a few subtle ways. First, The Unnamed Bird Rahi is in the first frame of its diving animation, and its shadow is offset slightly to the right. In the demo build, the shadow is directly below the bird at all times. Second, the Brakas is dropping a boulder, whereas in the final game it throws Madu fruit. Third, the Brakas sprite here is larger than in the final game:
Don't talk to me or my son ever again
None of these things by themselves are proof that this screenshot is fake. All of them could be explained away as minor differences between builds. However, there's something else about this screenshot that I have a hard time justifying. The "camera" is simply too high.
The image above shows the screenshot overlaid on the map as it appears in the final game, with grid lines spaced 8 pixels apart. (The game uses 8-pixel tiles, as is standard for GBA games.) Takua's position on-screen varies between all of these screenshots, but the general rule – as in the final game – is that he's roughly centered on-screen. So it's curious that in this image he appears far closer to the bottom of the screen, especially considering that the camera could easily be one tile lower. For reference, here's how the camera is positioned in the final game when Takua stands in roughly the same spot:
In fact, in the final game, the camera never pans up on this screen. The only way I can see this screenshot being legitimate is if the bottom row of tiles was added later in development – but there's no good reason for the developers to do that.
Let's move on to the other Le-Wahi screenshot. Once again, there's something strange about the birds: they don't have shadows. The easy explanation is that they don't have shadows when they're over empty space, but in the final game, they do:
It's hard to see, but it's there.
It's also interesting that the two spiders use the same sprite, just mirrored. The same is true of the birds. If a developer faked this screenshot, it would be easier for them to paste the same sprite twice and mirror one than to copy and paste two different sprites. (I'll grant that I wouldn't find this suspicious if I weren't already looking for evidence of forgery.)
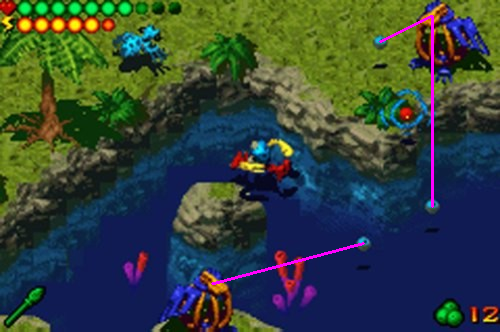
This screenshot is the most complicated to explain. The Volo Lutu Launcher's grapple ball is attached to a bush on the shore, and it has the shockwave effect around it that appears in the final game when the launcher is used. However, we can see that the launcher isn't equipped to either of the shoulder buttons, and Takua is jumping, not being pulled towards the grapple ball.
Three Madu fruits are also on-screen. The logical assumption is that they were thrown by Takua, but the angles they would have to be thrown at seem unlikely:
Considering how fast the Madu fruit moves in the final game, it's practically impossible that the player would be able to throw three of them from such odd angles in such a short duration that they all appear on-screen. A possible solution is that these projectiles come from the large bird Rahi, rather than from Takua:
However, Madu fruit thrown by enemies uses a different color palette than if thrown by Takua. Below is a comparison, side by side with the fruit seen in the screenshot:
The left side uses the upscaled but blurry GameReactor screenshot as a base; the right uses the 1:1 scale but jpeg-y IGN screenshot. The Madu fruit in the center with the blue shadow is the kind thrown by enemies, and the one on the right with the dark shadow is the kind thrown by Takua. I'll admit that neither is a perfect match, but the fruit in the screenshot looks closer in color palette to the Takua variant.
As a final note, the two birds use the same sprite, but mirrored, and the Madu fruit all use the same sprite. Once again, this could be evidence that the sprites were copy-pasted.
The natural response to all of this is probably "Jesus, dude, so what?" You see, originally I was planning on analyzing all of these screenshots as if they were accurate representations of what the game looked like at some point, and now that's out the window. I still plan on analyzing them one by one, but now I'll do so in the same way I'd look at concept art. As to why the devs would fake screenshots of their own game, well, look at the GBA developer kits I linked up above. Probably it was easier for them to just paste a few sprites into Photoshop than to take a good-quality screenshot off one of those things. (I mean, they used a camcorder for the demo footage, for goodness' sake.) And, frankly, who would notice?
Anyway, hopefully you can see the merit to what I'm saying, and it doesn't seem like too much of a goofy conspiracy theory. If not, well, I'll gladly accept my role as the community crank.
Before I get too far afield, I should probably finish up with the demo video. There's less to say about the second half, but there's still some interesting stuff going on!
00:32: I haven't looked too closely at the minigames yet – I might circle back around to them later. All I have to say at the moment is that you can see the camera (I think?) reflected in the dark part of the screen.
00:37: We cut back to regular gameplay, somewhere in Ta-Wahi. The terrain doesn't match any map in the final game. Takua knocks the masks off a couple of Fikou, and they each spawn a pickup that refills one pip of health. At the risk of repeating myself, this doesn't look like the health pickup in the final game to me.
There are also several lightning ball pickups scattered about.
Curiously, collecting these seems to increase the counter displayed in
the lower right hand corner of the HUD, next to an image of the energy
pickup from the final game. The lightning ball appears in the final game
as a projectile launched by the electric spiders in Le-Koro. Perhaps it
was used as a stand-in here before the energy pickup's sprites were
finalized. It's also interesting that the pickup doesn't seem to
replenish energy by itself.
Perhaps energy pickups were intended to be
added to the inventory, where they could be used by the player? The
unused inventory sprites seem to suggest as much, as would this tip (which only shows up if you talk to a particular Matoran in the tutorial more than once):
This is just an excerpt. The rest is unremarkable.
When the Fikous are K.O.ed, a star animation appears over
their heads, probably to indicate that they aren't actually dead. In the
final game, this animation is used when stunnable enemies are blinded
with the firestaff, as well as when a Madu fruit hits Takua on the
head. My guess is that it was done for performance reasons. The game
has a real problem with screen tearing when too many objects are loaded
into a level, and if every defeated enemy spawned a star animation, that
would effectively double the number of objects. Alternately, this
could've been changed to better differentiate when an enemy is stunned
from when it's defeated.
00:44: A jump cut to a different location in the same map, where Takua uses the firestaff. There's nothing too interesting going on here, but it does give us a better sense of what the map looked like.
00:49: Cut to Huai Snowball Sling. Again, I have nothing to add here at the moment.
00:57: The titlecard shown in the last few seconds is identical to the one shown in the first few seconds.
For a one minute video, there's a lot to unpack here. This post will cover the first 31 seconds. If you're playing along at home, it might be helpful to go frame by frame, which you can do on Youtube by pausing the video and pressing the period and comma keys.
00:01: This footage, released in early March, obviously came before the Maori controversy in June, so it uses the game's original name.
00:06: Sadly, this splash screen doesn't appear in the final game. It was replaced by a similar image in which Takua isn't dabbing. Neither the dab nor the serifed "PRESS START" are in the game's memory.
00:08: The demo menu screen. The BIONICLE logo is slightly smaller and the arch it's displayed on is slightly larger than in the final game, perhaps to make room for a subtitle. Tahu's mask looks like it's based off one of the prototype models with a code on the forehead. The bottom of the frame is also slightly larger, with a strange piece in the center. The "Tohunga Games" option was, understandably, changed to "Mini Games" in the released version. There's also a "Credits" option. Once upon a time, the Cutting Room Floor page for this game mentioned that there are two unused options on the title screen that both go to the credits. Unfortunately, the Youtube video showing this has been deleted.
A quick comparison between the demo footage and the final game.
If you're unfamiliar with the final map, it's available here.
00:12: Here's the starting beach, which looks fairly similar to how it appears in the final game. The big differences are that Jala isn't here and there are two palm trees. Madu fruit is bound to the left shoulder button, and it appears that Matau's Kau Kau staff is bound to the right. The number of Madu fruit seems to be glitched. A similar thing happens in the final game when you use cheats to have more than 199 of any object:
On first glance, the Madu trees look odd, but that's just because their sprite doesn't have a shadow, unlike the final version.
00:14: Takua shakes a tree twice. In the final game, this animation ends with a Madu fruit falling on his head, stunning him. In the demo, this doesn't happen.
00:18: An abrupt cut to further up the beach. There's a palm frond poking in from the bottom left corner. I assume that, between the last segment and this one, the player cut down the rightmost Madu tree using the Kau Kau staff. However, this particular palm frond is not a part of the final felled Madu sprite, implying that sprite was changed between the demo and the final build.
The player goes on to smash the boulder using Onewa's hammer, using the same animation as in the final game. They pick up the rock ammunition, heft the smaller boulder over their head, and walk further up the beach. The one change to this section of the beach is that the tutorial signs from the final game are absent.
00:25: Takua throws the boulder he's carrying, and a shadow flashes in the upper right corner. It's unclear if this is a Rahi or if the throwing animation was glitched somehow. I lean towards the latter.
00:27: Another smash cut to a higher part of the level. The shape of the coastline is different, but the rocks and treeline are the same as in the final version of the game, which means we can be pretty certain about where this was. (See the map, above.)
The Hoi turtles and Takua are unremarkable, but look: it's our old friend, the Unnamed Bird Rahi! Three of them, in fact!
The demo footage is approximately 1.7x larger than the final game.
The sprites I've added are scaled 2x.
There are a few notable things about the bird as it appears in this demo. First, the shadows for the normal flying animation are different from those used in the final game. I'm willing to bet that they are also pixel-perfect silhouettes, just like those for the unused swooping animation. Second – though this could just be me seeing things – I think that there are more frames for the normal flying animation than are in the final game. (If I had to guess, I'd say there are twice as many.) The picture above hopefully illustrates my point; if it doesn't, well, that's fine.
00:29: One of the birds hits Takua, knocking him from 11 health to 0 health. Neither a damage animation nor a death animation plays. In any case, the bird uses the unused swoop animation, and it seems to include the frames that are missing in the final build.
00:31: As the video fades to black, the bird on the right swoops at Takua's previous position. This animation also includes frames missing from the final build. Note that its shadow appears to be directly below it (that is, not offset left or right). This will be important in a future post.
There are nine screenshots and one video of development builds of Lego Bionicle GBA, and I plan on analyzing them all. But, before I get too deep into things, I should probably establish where and when they all came from.
The video, mov_tales.avi, is included on the Power Pack CD, and was last modified on March 7, 2001, like most everything else on the disc.
mov_tales.avi.
The first batch of screenshots we have were posted by IGN Pocket on Monday, March 26, 2001, following Nintendo's Camp Game Boy Advance press event, which happened over the weekend. Thankfully, the images are still hosted on IGN's servers. (They're numbered 1.jpg through 8.jpg, if you want to look for yourself.)
The eight screenshots from IGN Pocket.
The next set of screenshots was posted by NintendoWorldReport some time later. Since the five images they posted are captioned Electronic Entertainment Expo 2001, it's likely that they were given these screenshots at that conference, which took place from May 17-19, 2001. Four of the five screenshots are functionally identical to those posted by IGN; the only differences are the jpeg artifacts and the IGN watermark.
The five screenshots from NintendoWorldReport.
There are other versions of these images, presumably because the press kits with these images were distributed to gaming sites. The IGN and NWR sets are just the only ones that mention a specific date. An extreme example of this is the European gaming site GameReactor. It's unclear, but it seems like they posted their versions in 2003, in the mistaken belief that they were screenshots from Bionicle: The Game (GBA). They have the same five screenshots as NWR, but they are resized to be 500px wide. This is kind of a double-edged sword; they're blurrier, but the jpeg artifacts are less of an issue. These versions of the screenshots are the ones in the BS01 "Quest for the Toa" gallery. (BS01 also has a pixel-perfect version of the Le-Koro screenshot, which I haven't been able to source.)
The five screenshots from GameReactor, for completeness' sake.
To put these dates in perspective, NWR reported on July 18, 2001 that the game had been finished "for a while," and was waiting on Nintendo's approval. That means that the Power Pack demo footage and the IGN screenshots were distributed around 3-4 months before the game was finished.
Anyway, that's a lot of text to say very little. Next time, I'll start actually analyzing the differences between the demo footage and the final game, which should hopefully be more exciting!
Tl;dr: the Power Pack demo video is from before March 7, 2001. At least 8 of the 9 screenshots are from before March 24, 2001. For reference, the game was supposedly finished "a while" before July 18, 2001.


